Embroidery 101: Finishing the Quilt (Part 2)
Now that you have your quilt layered and quilted, the final step is to bind the quilt. Even though binding is a basic quilting function, just like the layering and quilting, there are a variety of methods. Perhaps you’ve already noticed this about me, but I like to stick to the simplest, so here is my method for binding.
First, cut enough 2 1/2″ strips to wrap around the length of the quilt. To calculate, measure the perimeter, divide by 40 and the result is the number of strips you need {for this quilt, without sashing, I used 5}. I seam all my strips together without worrying about angling the stitching line. The difference seems insiginificant to me, and I find straight seams much easier. Then, press the binding in half lengthwise. When finished, you’ll have a nice roll of binding all ready to sew.
When sewing the binding to the quilt, place it raw edge out along the edge of the top of the quilt. The folded edge should be pointing toward the center of the quilt. Leave about 8 inches of binding unstitched at the beginning of the quilt, this will be used to join the ends.
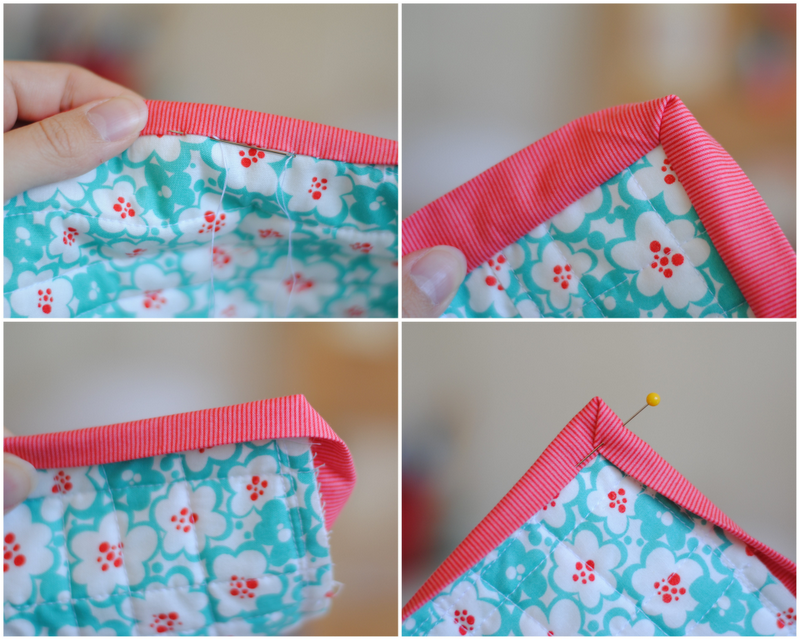
I stitch my binding about 3/8″ from the edge instead of the traditional 1/4″, this allows the binding to be even on the front and back without having to leave extra batting. When approaching the corner, stop 3/8″ short and either back stitch or tack in place.
Turn the binding up, creating a 45° angle. Then bring the binding straight back down. I like to pin the corner in place. Start stitching again 3/8″ from the edge and from the corner as shown. Make sure to stitch only on the binding on the new side of the quilt {I hope that makes sense}. The stitching should not go through the folded corner area.
After stitching around the entire quilt, stop about 8 inches from the starting point. Fold the binding so that it almost meets and press a crease. If I fold the binding to touch, I am always left with a little extra and a crease, so that is why I leave a little gap.
Using the creases as a guideline, stitch the two ends of the binding together. Trim the fabric and press it open. Then sew the portion that remains to the quilt. To finish the binding, fold it around to the back and hand stitch in place {I am hand stitching this binding because there is so much hand work in the quilt}.
To hand stitch, take a small stitch through the binding, then a slightly longer stitch under the backing, and bring the needle back out, taking another small stitch through the binding.
At the corners, fold the corner around toward the back to make a miter. Then fold one side down, hold in place, and fold the other side to make a miter on the back. I like to pin the corners in place until I’ve stitched to them. Just continue all the way around and your quilt will be bound!
And, to finish things off, I’d like to announce the winner of the giveaway for finishing the quilt top:
Thank you everyone for your participation and encouragement. It has been great to stitch with each of you and share a common love of embroidery and quilting. Happy stitching!
P.S. I posted my finished quilt in a separate post, you can see it here!





Congratulations to the winner and thank you for hosting the stitch&quilt along, I enjoyed these cute little stitcheries.
Congratulations Rhonda!
I love your corners, how do you get them so pointy and crips?!
Congrats Rhonda and thank you Jennie for a great quilt/stitch along!
I am waiting a trip to the store to buy thread to quilt this thing. =) AFter that the binding will be easy enough. I’ve got to send my friend to your blog…she’s thinking of trying the QAL! =) I hope she does.
Congratulations to the winner and thanks again Jennie for hosting this great quilt along.
Congratulations Rhonda!! and thanks Jennie for the tutorial…