Embroidery 101: Stitch & Quilt Along
Welcome to the kick off for the Embroidery 101: Stitch & Quilt Along! I am so excited to make a fresh, fun, bright quilt with all of you that incorporates embroidery. Embroidery seems to be one of the current quilting trends, and I’m more than happy to take part. But, it seems that a lot of quilters want to add embroidery to quilts and projects, but don’t know where to begin, that’s why this is an Embroidery 101 Stitch & Quilt along, because along with fun embroidery designs, I’ll be showcasing different stitch tutorials to get your embroidery off to a good start.
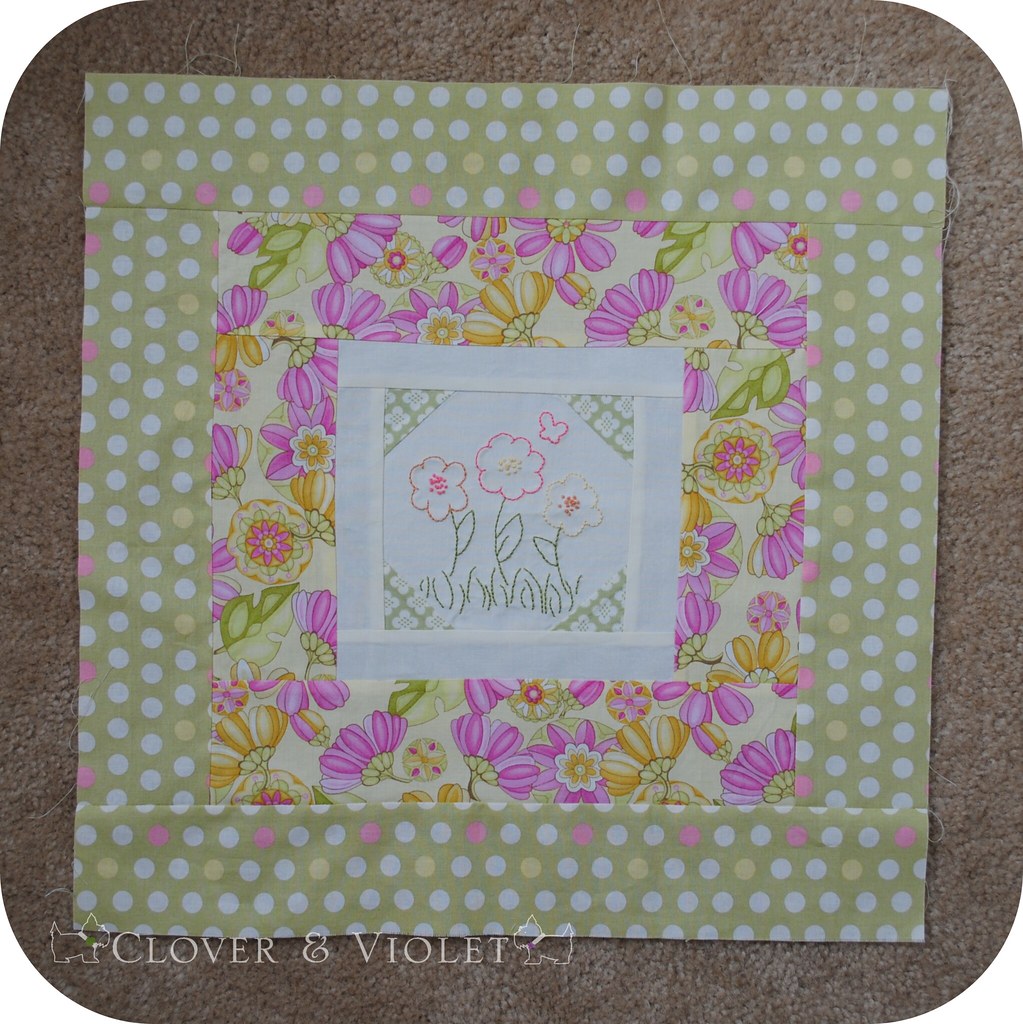
The block you see to the left is the first block of the quilt along. I’ve designed a simple block that will showcase the embroidery, and offer a good sized quilt in the end, without a lot of piecing. The finished blocks are 18″ square, and there will be nine total, for a 54″ square quilt. However, one could easily complete one block as a wall hanging, or four for a mini quilt, variation is great!
So, today, we’re going to start with gathering supplies. For the full sized quilt you will need nine fat quarters or 1/4 yard cuts of fabric, and about 5/8ths yard of a white or off white solid.
I’m using Just Wing It by Momo for Moda. If you’re interested in using the same fabrics, then you’re in for a treat! We’ve partnered with Sew Lux Fabric & Gifts and they’re offing a kit of the exact fabrics pictured above, as well as 3/4 yard of Moda Bella Solid White. There are only a limited number of kits available, due to the popularity of some of the prints. Click here to get yours!
Here’s a better view of the fabrics I’ve chosen. If you decide to chose different fabrics, I recommend you try to use a variety of different print sizes. Since the blocks will be large and will have larger pieces of fabric, the quilt design will look best with a variety of larger prints mixed in. I also like the color variation, but that is just a personal preference.
I’ve talked about thread before, and here are the threads I’ve chosen, Finca Perle Cotton size 8 . I’ve used it a bit now and am very happy with the choice. I’ve listed the color numbers above, in case you want to buy/order the same. Otherwise, I’d recommend choosing about nine colors to coordinate with your fabrics. I’m using the Perle cotton because I worry that regular thread may not hold up well to washing, which it would face in a quilt.
And, sampler packs of 10 yards of each thread are also available from Sew Lux Fabric {here}, giving you the option to purchase a starter kit before investing in the entire set {you should be able to make the whole quilt with those threads…but, as I haven’t designed all the blocks, I can’t make any promises}.
Other supplies: 1/2 yard light-medium fusible interfacing {I’m using Pellon 880F Sof-Shape} for the back of all the white center squares, hoop, needles, and design transfer marker. For more info about those supplies, click here.
More details: I’ll have fabric cutting and block piecing instructions next week, then the first tutorials and embroidery pattern the following week. After that, embroidery tutorials and blocks will rotate every other week. I want to give everyone time to complete each block before moving on to the next one {sorry to you speedy stitchers and quilters…one of the reason I always fail at quilt alongs is they are finished before I even start!}.
Practice: You also may want to purchase a small amount {one or two hanks} of regular embroidery thread for practicing any new stitches or portions of the blocks {I did a practice run of the first block – shown above, and I also like to practice some stitches to get a feel for them before I start a block.}
Backing & Binding: For the 9 block quilt, you’ll need about 3 1/4 yards backing for a traditional back. I am going to try to piece my backing with 1 5/8ths yards and my scraps…but I’ve yet to make sure it works… For the binding you’ll need 1/2 yard of fabric.
Spread the love: Grab one of our buttons and wear it proudly! Also, the button will link back to the Embroidery 101 index page, which will have an index of links to each post and our approximate timely, so you’ll always be able to find the info you’re looking for.

Show & Tell: What’s the fun of a quilt along if we don’t make new friends and see each other’s progress? So, please feel free to join the Flickr group! Also, if you write a blog post about your fabric choice, link up below so we can check it out {there will be a weekly linky for each step of the quilt along!}.
Win, win, win: And, because the ladies at Sew Lux Fabric are so generous, they’ve also partnered with us for a giveaway to be drawn from the participants who complete their quilt top. Together we’re offering six half yards {or 12 fat quarters} of fabric from their shop!
Well, you made it to the bottom of {one of} the longest post in my blogging history…whew! I hope this is as much fun as I am imagining it to be. So go shopping or get that fabric out and choose some thread, and let’s get started!
Don’t forget to show and tell in our Flickr Group! Did you blog about the quilt along, your fabric selection, or threads? Share your post here:


Yay! I found you through SMS and am so excited to do this. I appreciate that you’ve spread the tasks out as I’m one of those folks that quickly falls behind, too.
Off to post my button and dig through my fabric stash.
I’ve just started quilting and haven’t embroidered in years. I am really excited to get started. I just ordered the kit. Thanks for arranging that, I love kits.
Thank you! can’i wait to get started.off to the shop to buy threads!!
I placed my order for my fabric…I am so excited. I don’t normally order “the kit” but couldn’t resist this time. Thanks for doing this Jenny!! Is it ok if I mention this on my podcast?
I can’t wait! I have never done embroidery but am excited to learn. I ordered the “kit” just so that things would be simple to get started. Summer around here usually mean putting projects on hold since our summers our short and we want to spend as much time outside as possible. But this quilt along was to fun to resist. Plus embroidery and hand work is easy to take along camping :). I’m excited and love the fabrics.
I have fat eighth bundle of Central Park I could use. Will it work for this project? And how would I go about picking thread colors to go with it? There is no store around here that sells Finca Perle so I would have to order it online.
@Laura Beech Great questions! First, I’ve done some calculating and I think you could make fat eighths work. You will need 18 fat eighths, nine for the photo corners and inner square, and then nine for the outer square. The inner square and photo corners would not be a problem, but the outer square would need to be precise. I will add some directions for cutting on the fabric cutting post. However, I still think fat quarters will be easier. I don’t have the ability to test out a fat eighth, as my sewing stuff is now packed for transit. I would definitely try a sample block before cutting any of your main fabrics.
As far as embroidery threads, first, do you have a local quilt or yarn shop? You may be able to find another brand of Perle cotton size 8 (honestly, I chose Finca because it is the brand available at my LQS). If not, do you have access to DMC or Anchor embroidery thread? If so, you can take some swatches of fabric to the store, chose your colors, write down the numbers, and then use the color conversion chart: http://crossstitch.about.com/od/flossconversioncharts/Floss_Conversion_Charts.htm to help you order. You could also use regular stranded thread too.
Hope that helps!
I’m in! Love your fabric choices and the matching thread and the discount…..so….I ordered the whole works!
I too found you through give away day and I too just ordered the kit – too easy to not do it and I was drooling over that “Just Wing It” fabric on some of the blogs anyway. I’m excited about trying this. I haven’t embroidered in ages, but was thinking about trying a quilt with some on it, so you’ve inspired me to go ahead and give it a try. I think it will be good to take along on several car trips we have planned this summer – keep me busy while the hubby gets us there. Thanks for the inspiration and for making it easy with the kit.
Went out and bought my supplies today! Can’t wait to get started. I’ve never embroidered so this will be a first. I hope I have the patience for it.
I’m interested in doing this, and glad you have the kits already in place. I’ve never done embroidery, so I’m a bit confused about the needles as well as the fusible interfacing. Can you please e-mail me so I can figure out what kind of fusible interfacing I need? I’m not sure the LQS is going to be helpful as to exactly what a “light-medium fusible interfacing” is. I know I had problems with something else I purchased from them for a quilt. I’d also like to have an idea of which fabric would work best for the backing and binding. Crud! This is the reason I don’t like to participate in a quilt-along or an embroidery-along. I’m anal about stuff. That’s why it takes me so freakin’ long to complete a quilt.
Thanks! I’m really looking forward to participating in this. Probably won’t ever post a photo (long story) so won’t be able to be in the giveaways.
I’m in! I love embroidery and can hardly wait to get started. I placed my order for the fabric kit so I’ll be ready when you are. WooHoo!
Thank you for doing this.
Looking forward to stitching along with you all. I’m on the final block of a little embroidered quilt so perfect timing. Happy Stitching. Chris
can i join in please ?
i love embroidery and quilting and this looks like i could cope ok
That block pushes all the right buttons! Looking forward to more.
Kay in NJ
I found you through the SMS giveaway day too and I am soo soo excited to join the quilt a long!
Can I use the picture of your first block and the thread to post about this project on my blog? I will link the pictures back to this post.
Taking a deep breath and jumping in. Going to shop my stash now.
Great. I never stop learning either. There are often several ways to achieve the same outcome, and it is good to see other peoples methods.